

Setting up Your Design Files for Print
There are several things you’ll need to consider when initially setting your file up, this practical guide will walk you through the main processes. No matter whether you’re designing a Poster, Banner, Sticker or any other printed material from DWA Group we`ll point you in the right direction.
How to Prepare a File for Print
Pre-flight checking is vital when preparing PDF’s for submission. The earlier in a process that problems are detected, the easier it is to resolve these going forward. Acrobat Professional is readily available and generally utilised by many of our customers.
.
Embedded Fonts – Please ensure you save your artwork as a PDF/X1a to ensure the fonts are embedded. Alternatively, you can vectorise your fonts by outlining them or converting them to curves. You can also rasterise your fonts, but we suggest this as a final option as it can cause the edges of text to soften and not appear and sharp when printed.
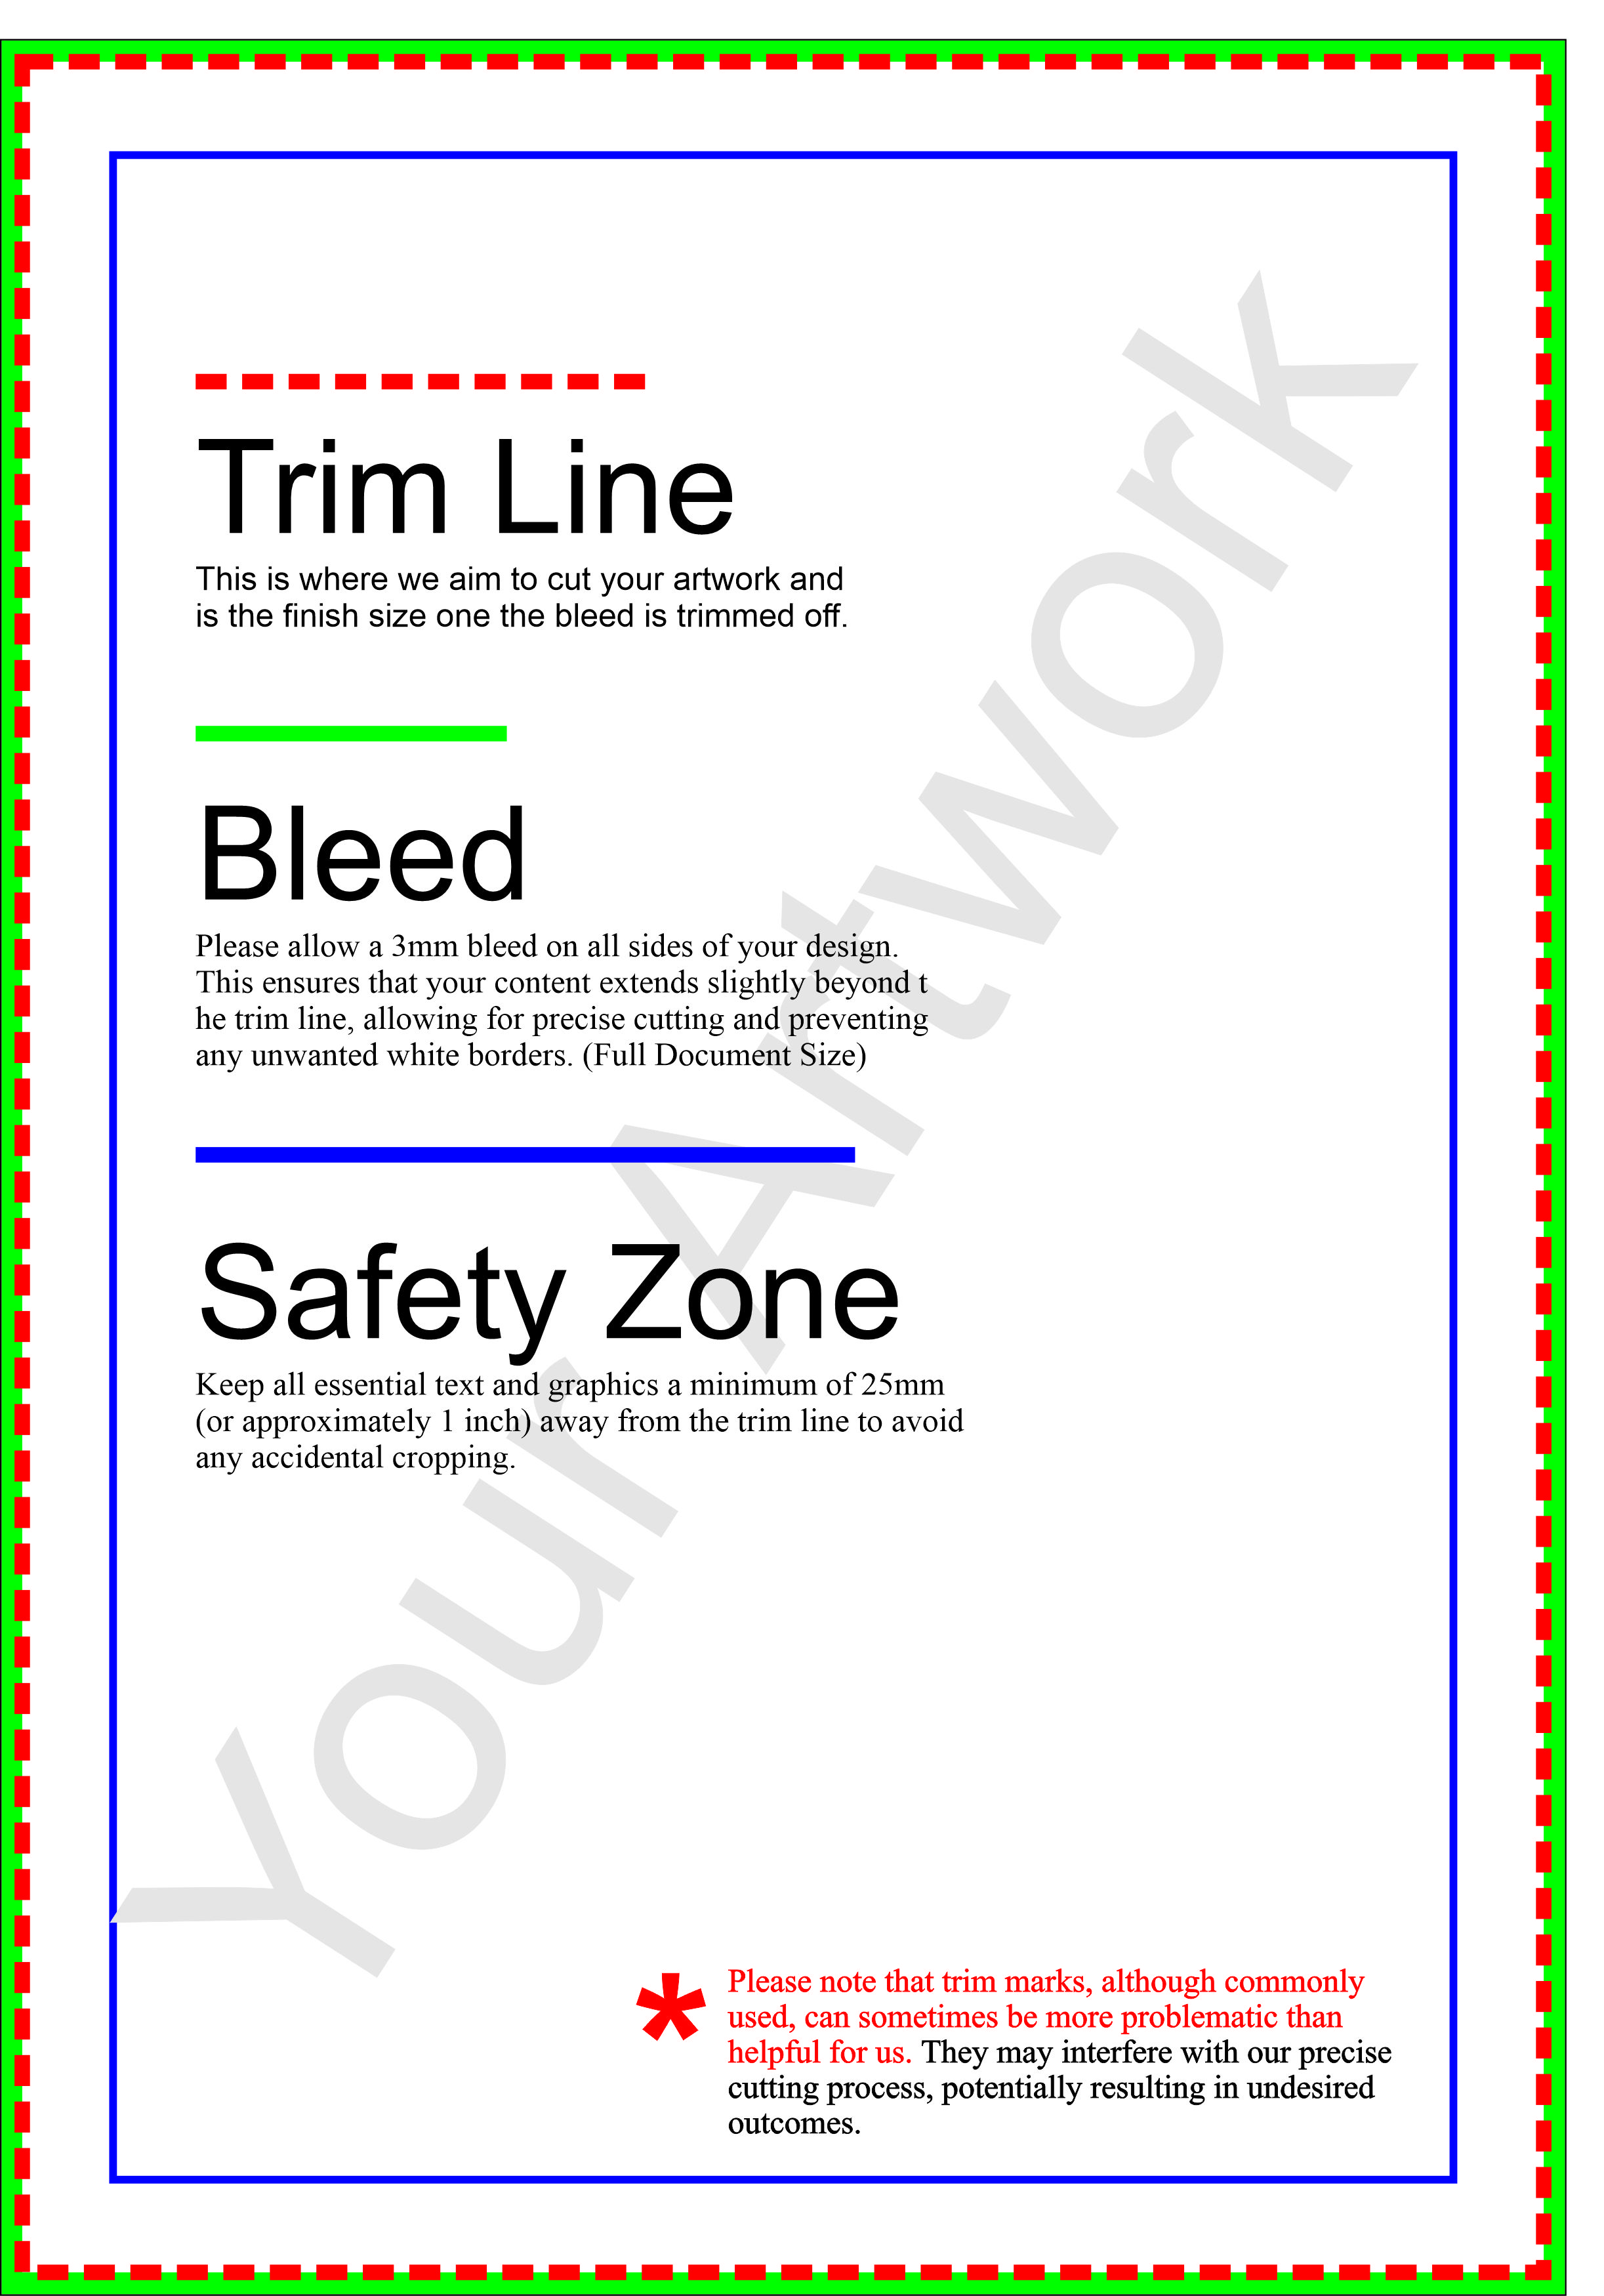
Crop Marks – trim marks, although commonly used, can sometimes be more problematic than helpful for us. They may interfere with our precise cutting process, potentially resulting in undesired outcomes. Therefore, we kindly request that you exclude trim marks from your submitted files.
Image Resolution – DPI “Dots Per Inch” is essentially the same as PPI, only translated into the real world of printing rather than the world of a digital computer screen. The lower the dpi of your images, the poorer the results may be once printed - the ideal standard is 300dpi.
Bleed – The area added to the edge of your artwork which includes any blocks of colour or background design which reaches the edge of the page. To create a bleed, simply extend your image, colour or text 3mm over the edge of the page.
Quiet Border – The area within your artwork which does not contain text, images or logos (unless they bleed off the edge.) We recommend at least 20mm, but preferably 25mm, from the trimmed edge of your artwork. We also recommend all borders are at least 3mm (ideally 5 mm) thick to ensure an even finish when trimmed.
File formats – We recommend that you provide us with a PDFx1a-2001 file, although we also accept PDF/x3 and PDF/x4 (as well as various other PDF formats for printing). We also accept jpg, eps or tiff and will turn your finished design into a print ready PDF, depending on the artwork service you select
Images – Imagery used in any artwork files for small-format print should be high resolution, the standard for which is 300dpi (dots per inch).
.
How to do your document set up due dilligance
When it comes to achieving the best print results, we would always advise you to carry out your due diligence. It comes as no shock but a costly reminder to check your spelling before sending it off to be printed. It does sound obvious, but you would be amazed at the number of costly spelling mistakes we’ve seen over the years. We have compiled a quick checklist below to help you get your print perfect every time:
.
RGB – When designing things for digital such as websites or social media graphics, you’ll be more inclined to use the RGB Colour mode. This is usually the default setting for most graphic design applications like Photoshop or Illustrator. Don't set your document to RGB for print.
CMYK – Always set your document to use a CMYK colour profile for print. If you accidentally use RGB, don't fret as we can convert these colours to CMYK. They may be slightly different than your original colours.
Sport Colour – Keep your colour setting as CMYK and use the swatches available in the colour library within the colour palette. These are Pantone®colours.
Fountain Fills & Transparencies – We cannot accept artwork for spot colour jobs containing fountain fills, however, fountain fills are accepted for full-colour jobs.
Overprint – is a specification in your print file allowing different colours to interact with each other. The only time we ask for overprint is when supplying Large format Vinyl or Labels on a roll product.
Adding text on top of a PDF – deally, to add to your file, open the original artwork file and enter your text there. Text won’t be embedded in the PDF if an Adobe Acrobat Typewriter tool is used.
Hairline – Hairlines may print well on your 300dpi printer in the office, but on our 2400dpi lithographic presses these lines may not be visible. We recommend using a minimum line weight of 0.25pt to ensure accurate results.
QR Codes – We can print QR codes and barcodes, however, please double-check they work correctly before submitting your artwork. Please also note, if you supply a Just Print job without a bleed, we will enlarge your job to create a bleed which will also enlarge any QR codes or barcodes present on the artwork.
ICC Colour profile – The output press profile we use is ISOcoated_v2_eci.icc so all images within your file will be converted to this profile. Any other profiles used in your file will be overwritten.
Ink Variation – Due to ink tolerances your colour may vary slightly from your design file and between print runs.
Colour Banding – Colours like Cyan, Yellow, Magenta or Black are prone to banding. Avoid using large areas of solid colour.
On-Screen Colour – If your colours are not referenced from a Pantone®Book but instead are a CMYK mix then we cannot predict how they will look when printed.
Vector/Bitmap Colour – Once printed, areas of colour in your artwork that have vector fills will appear differently to bitmap fills, even when the colour values are identical.
Fonts – Minimum font size on any printed jobs should be not smaller than 5pt, we do recommend using 100% black for text smaller than 12pt. As mentioned previously, text should also be embedded within the document.
Colour Variations In Paper Stock – The type and colour of paper you choose for your print job may affect the final printed colours within the job as all inks are transparent
Supplying Multiple Sets – To create a PDF from multiple PDF files please use the ‘Combine Files into PDF’ function in Acrobat and save the pages again as a singular PDF. If your software does not have this function there are many options available if you search “Combine PDF files” online.
.
.
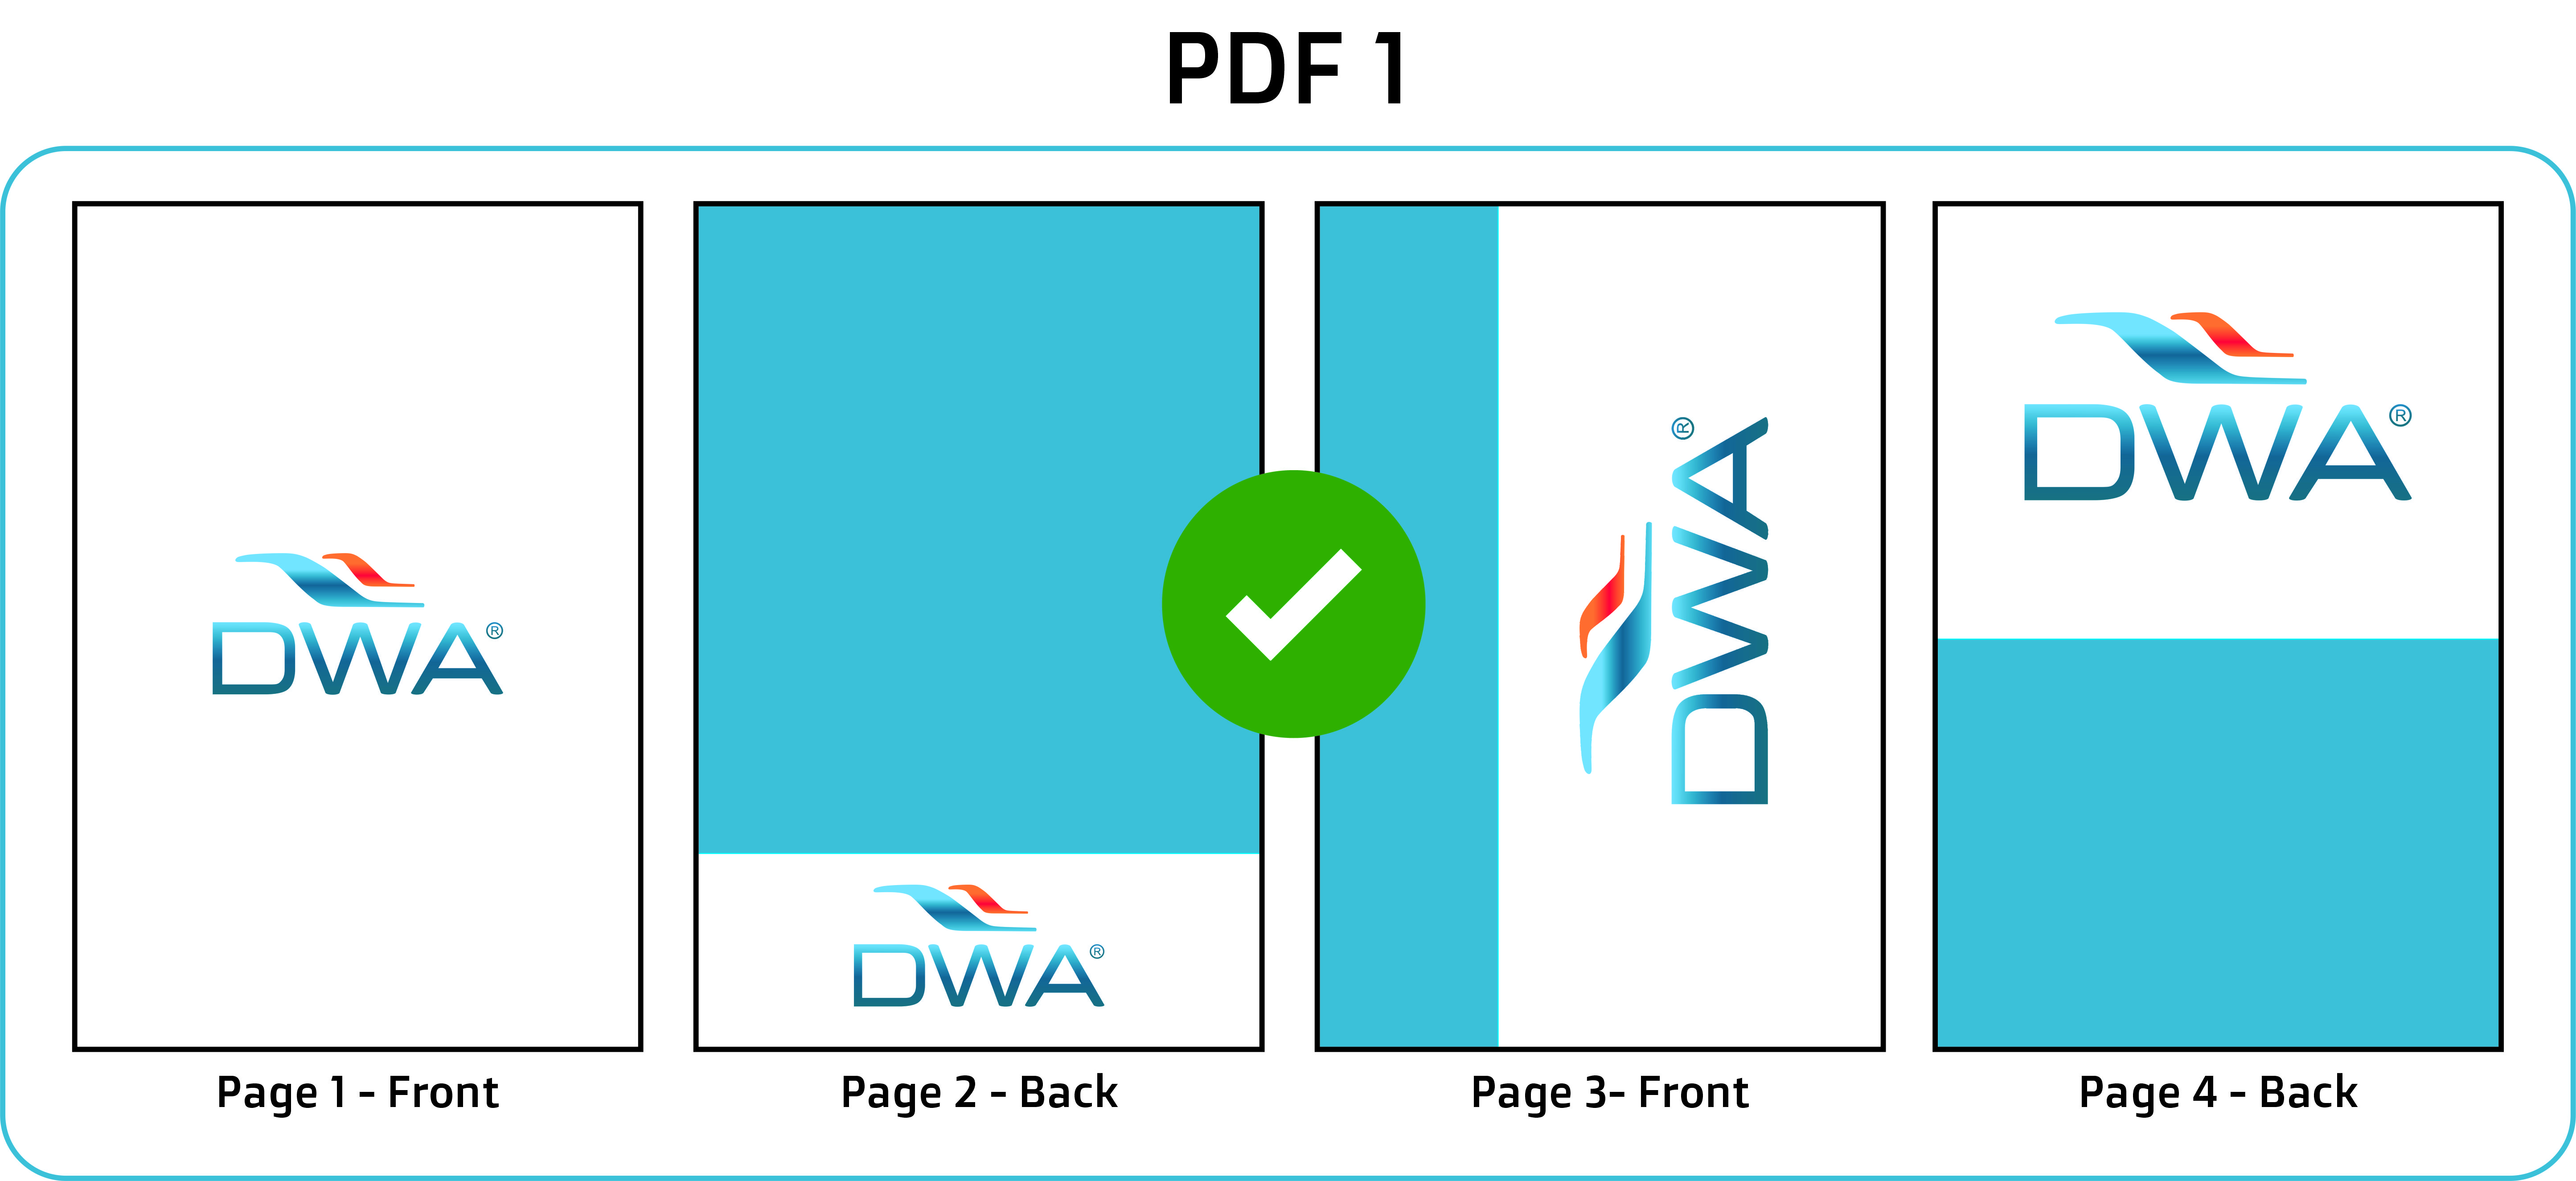
1. Multi-page PDF option is 1 PDF which contains multiple pages.
.
.
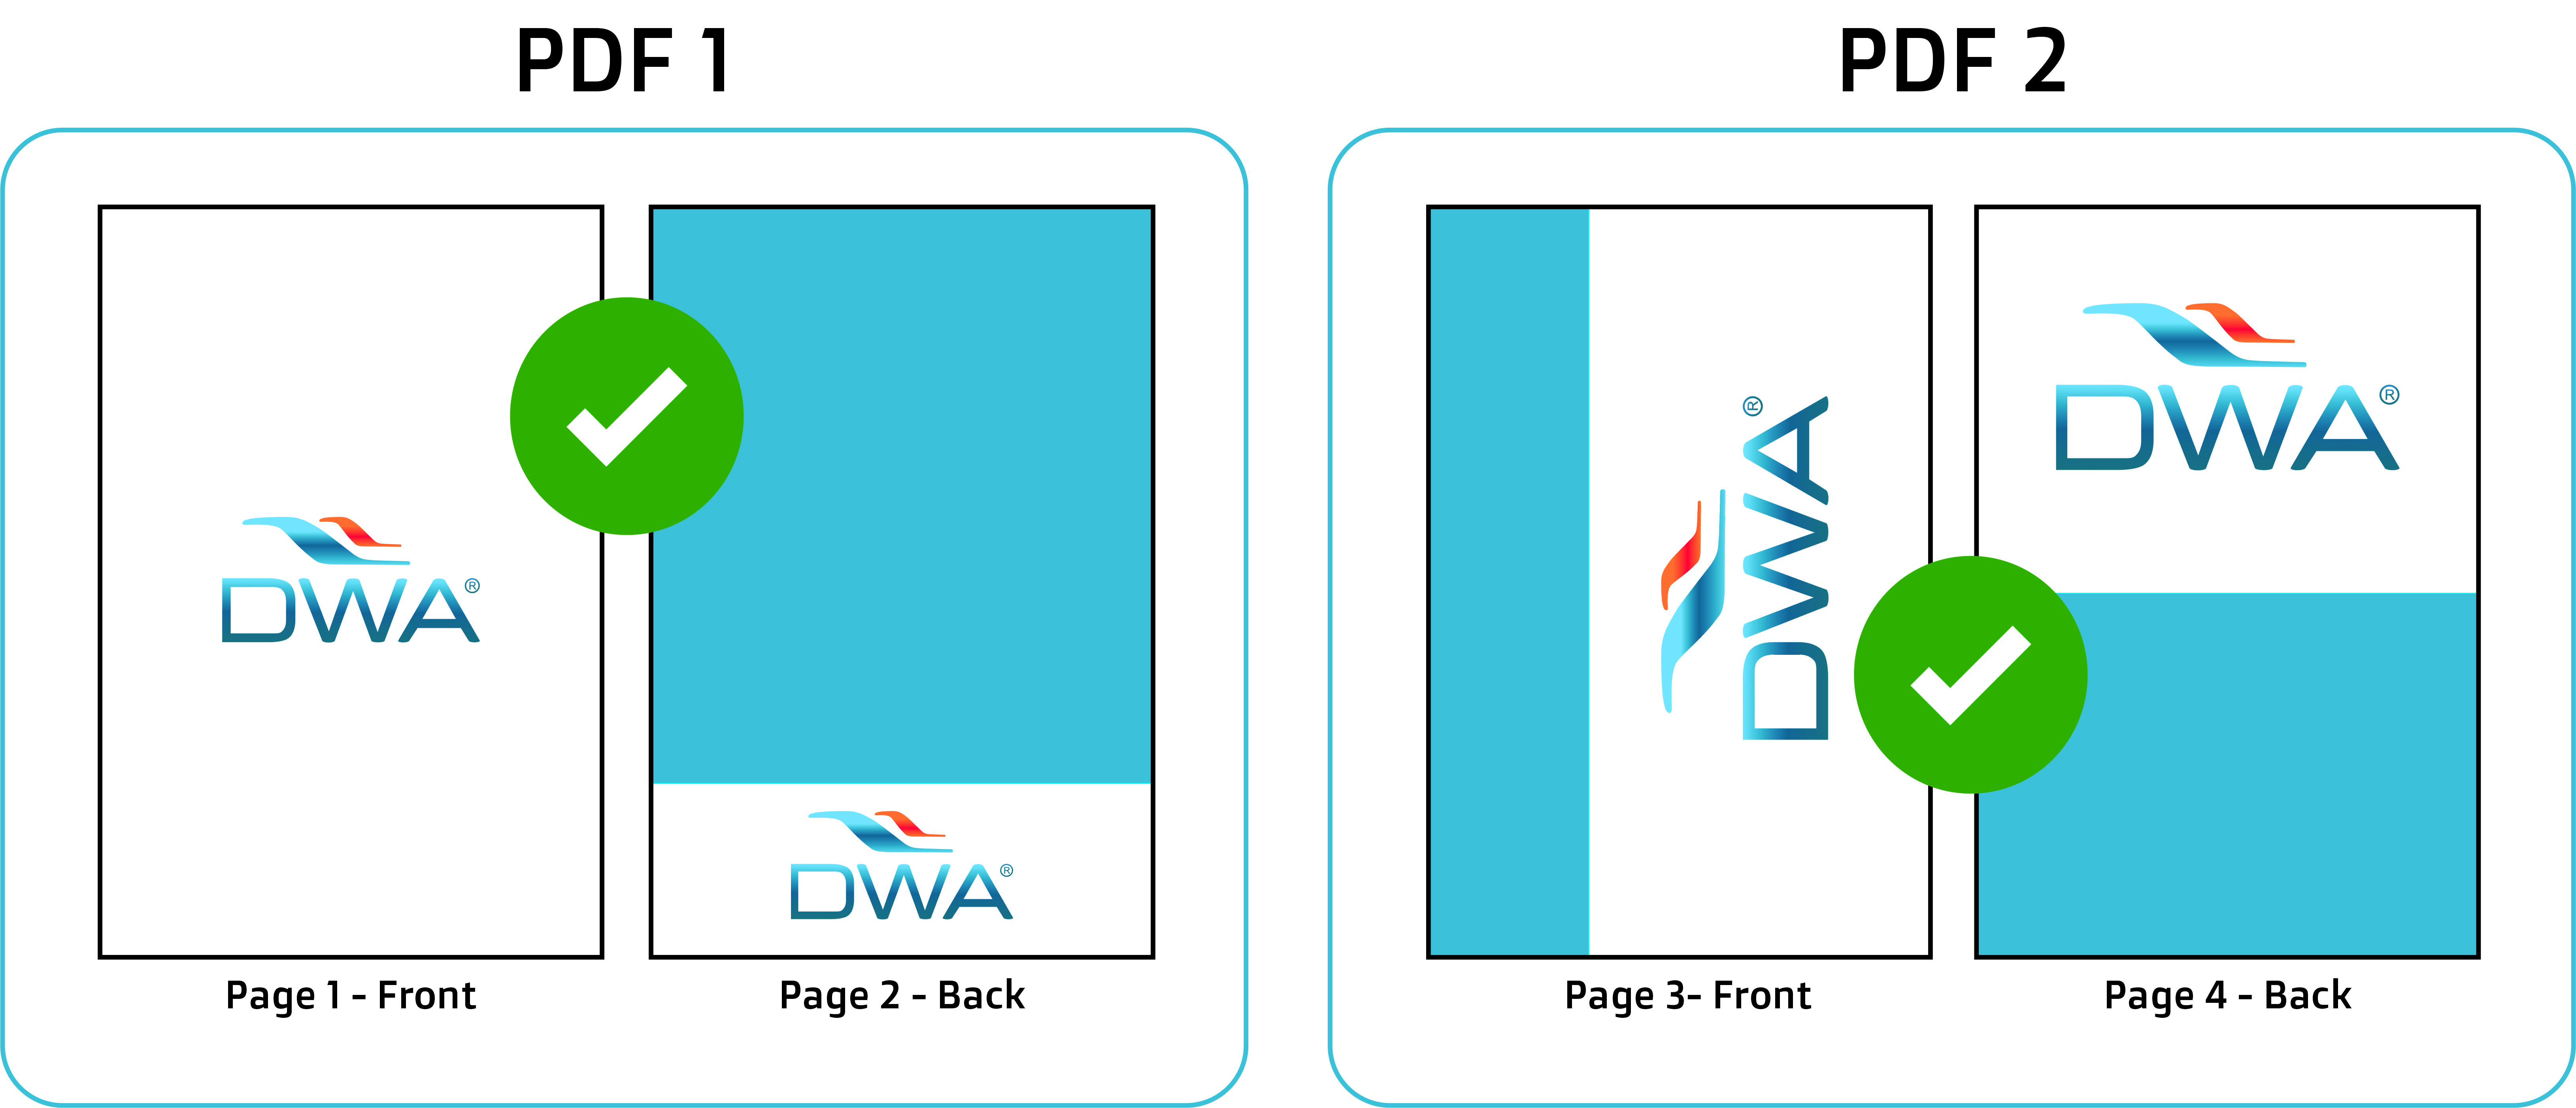
2.Page PDFs combine each set into individual PDFs.
.
.
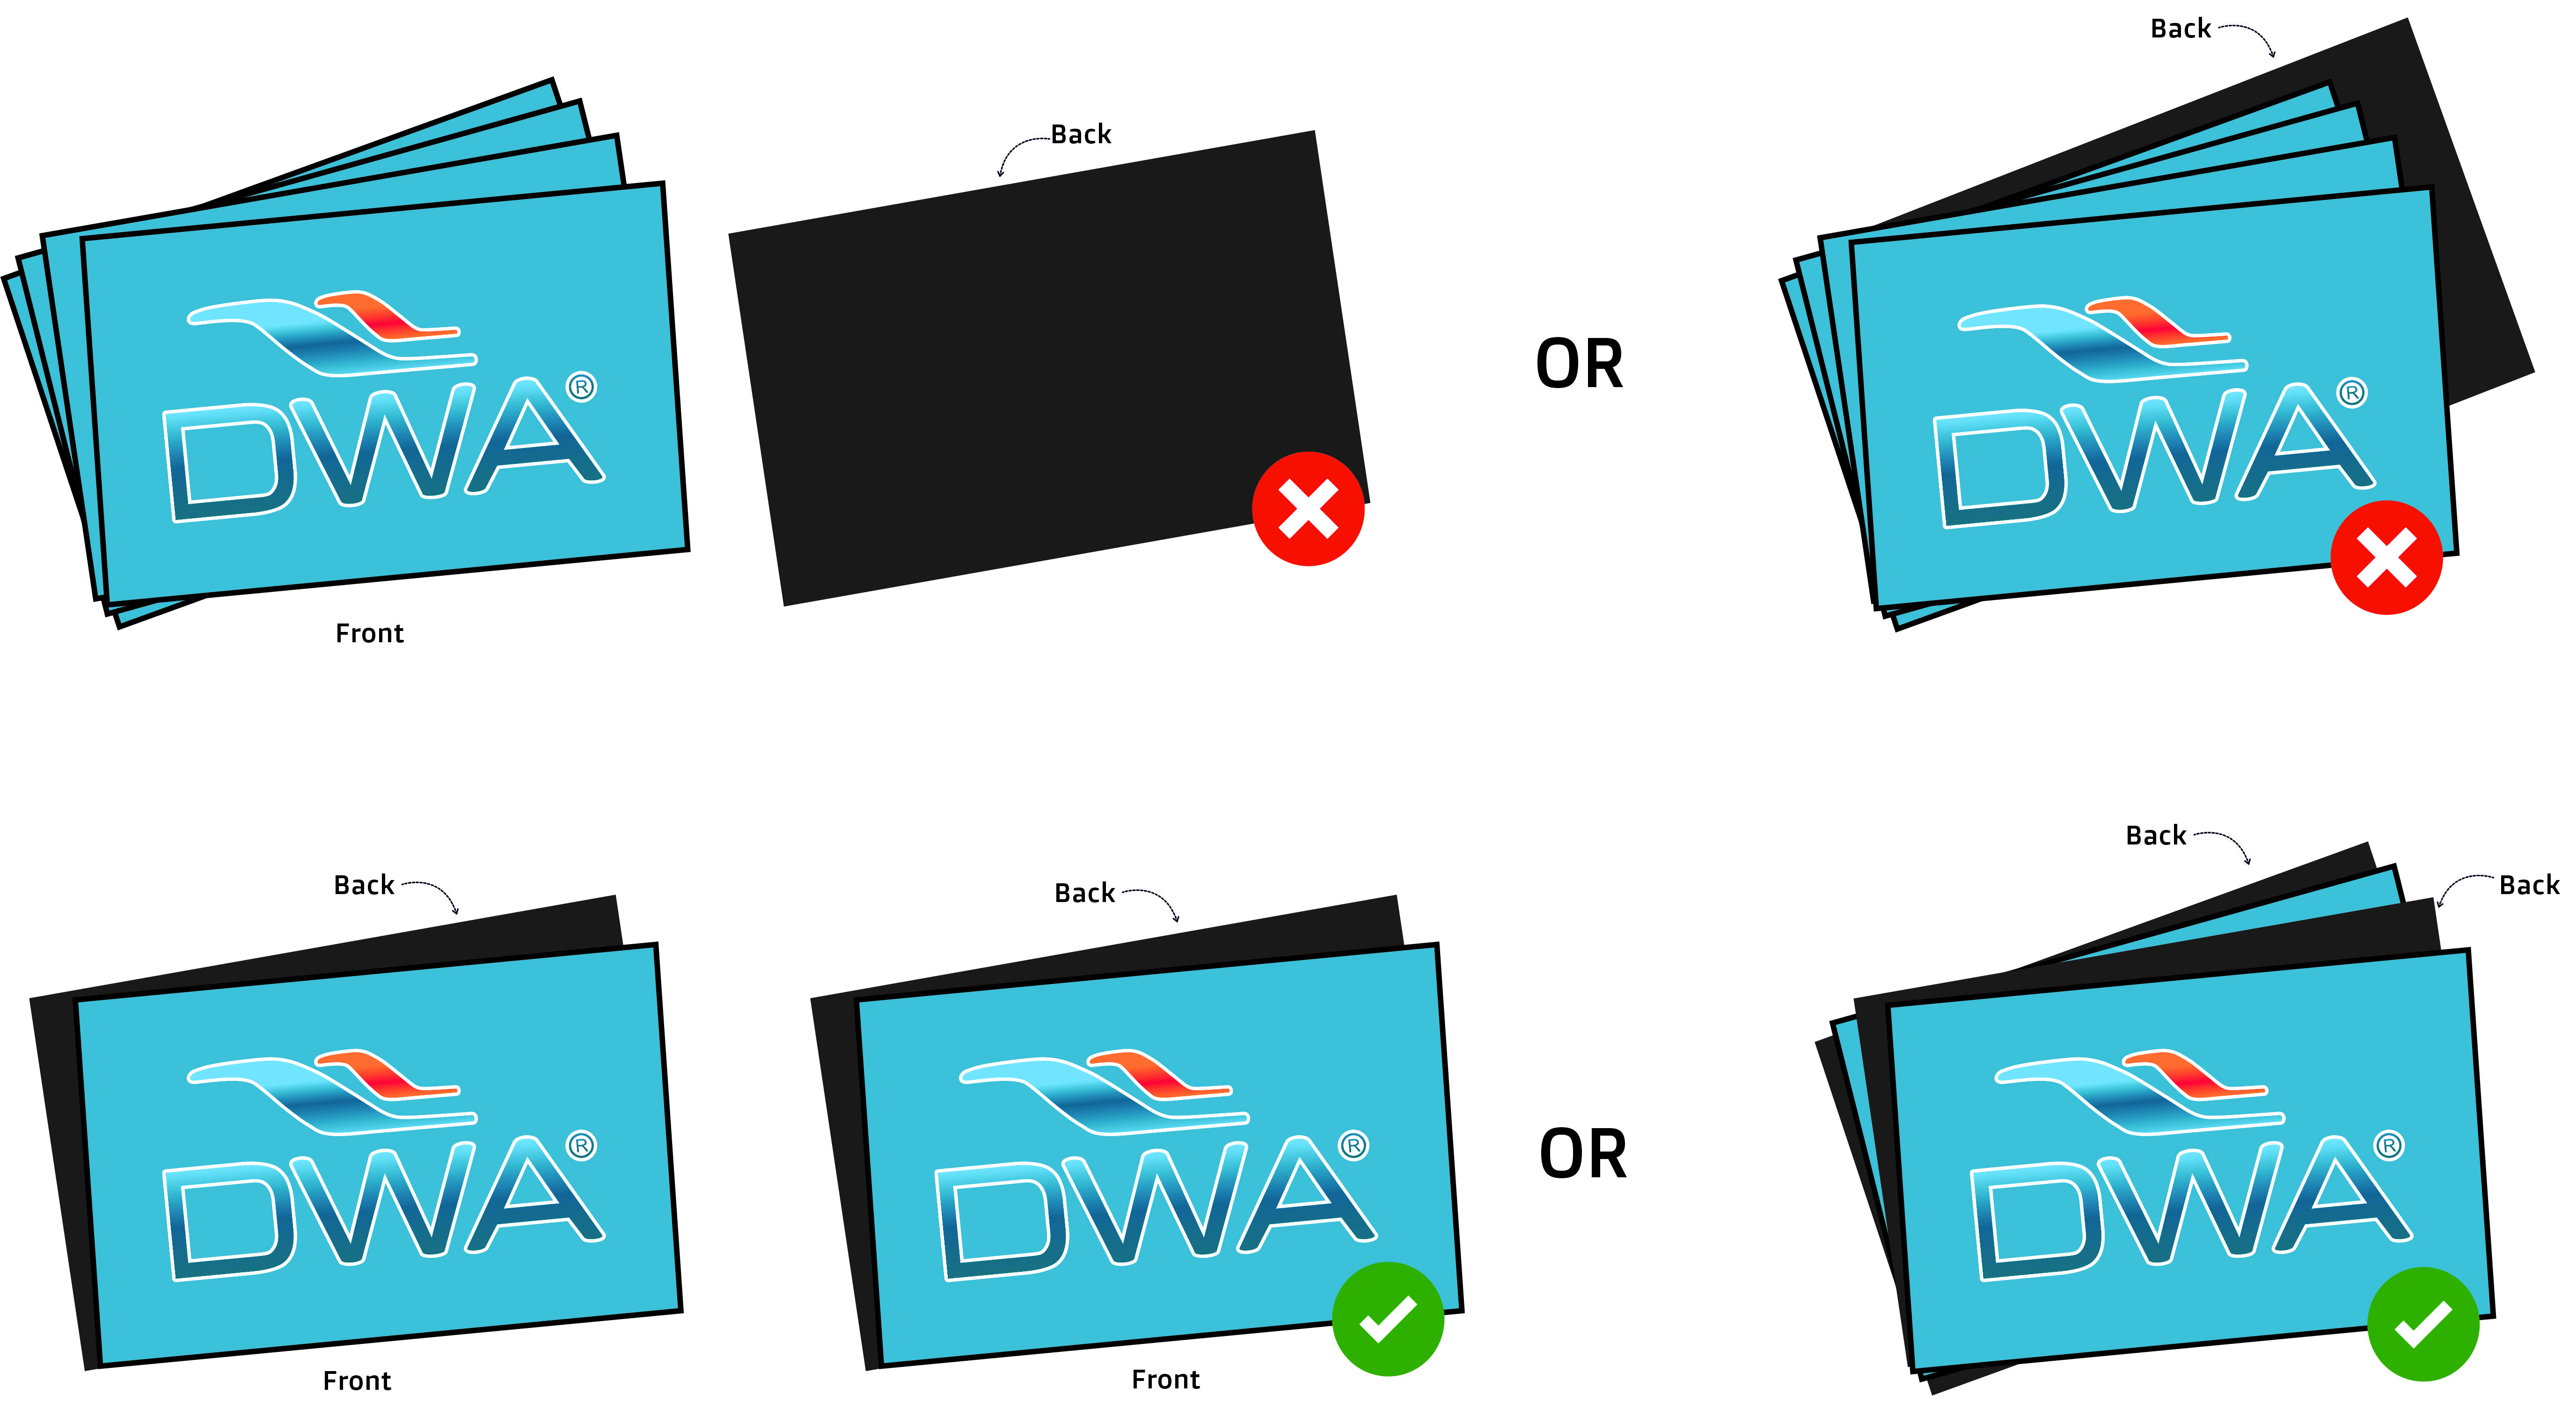
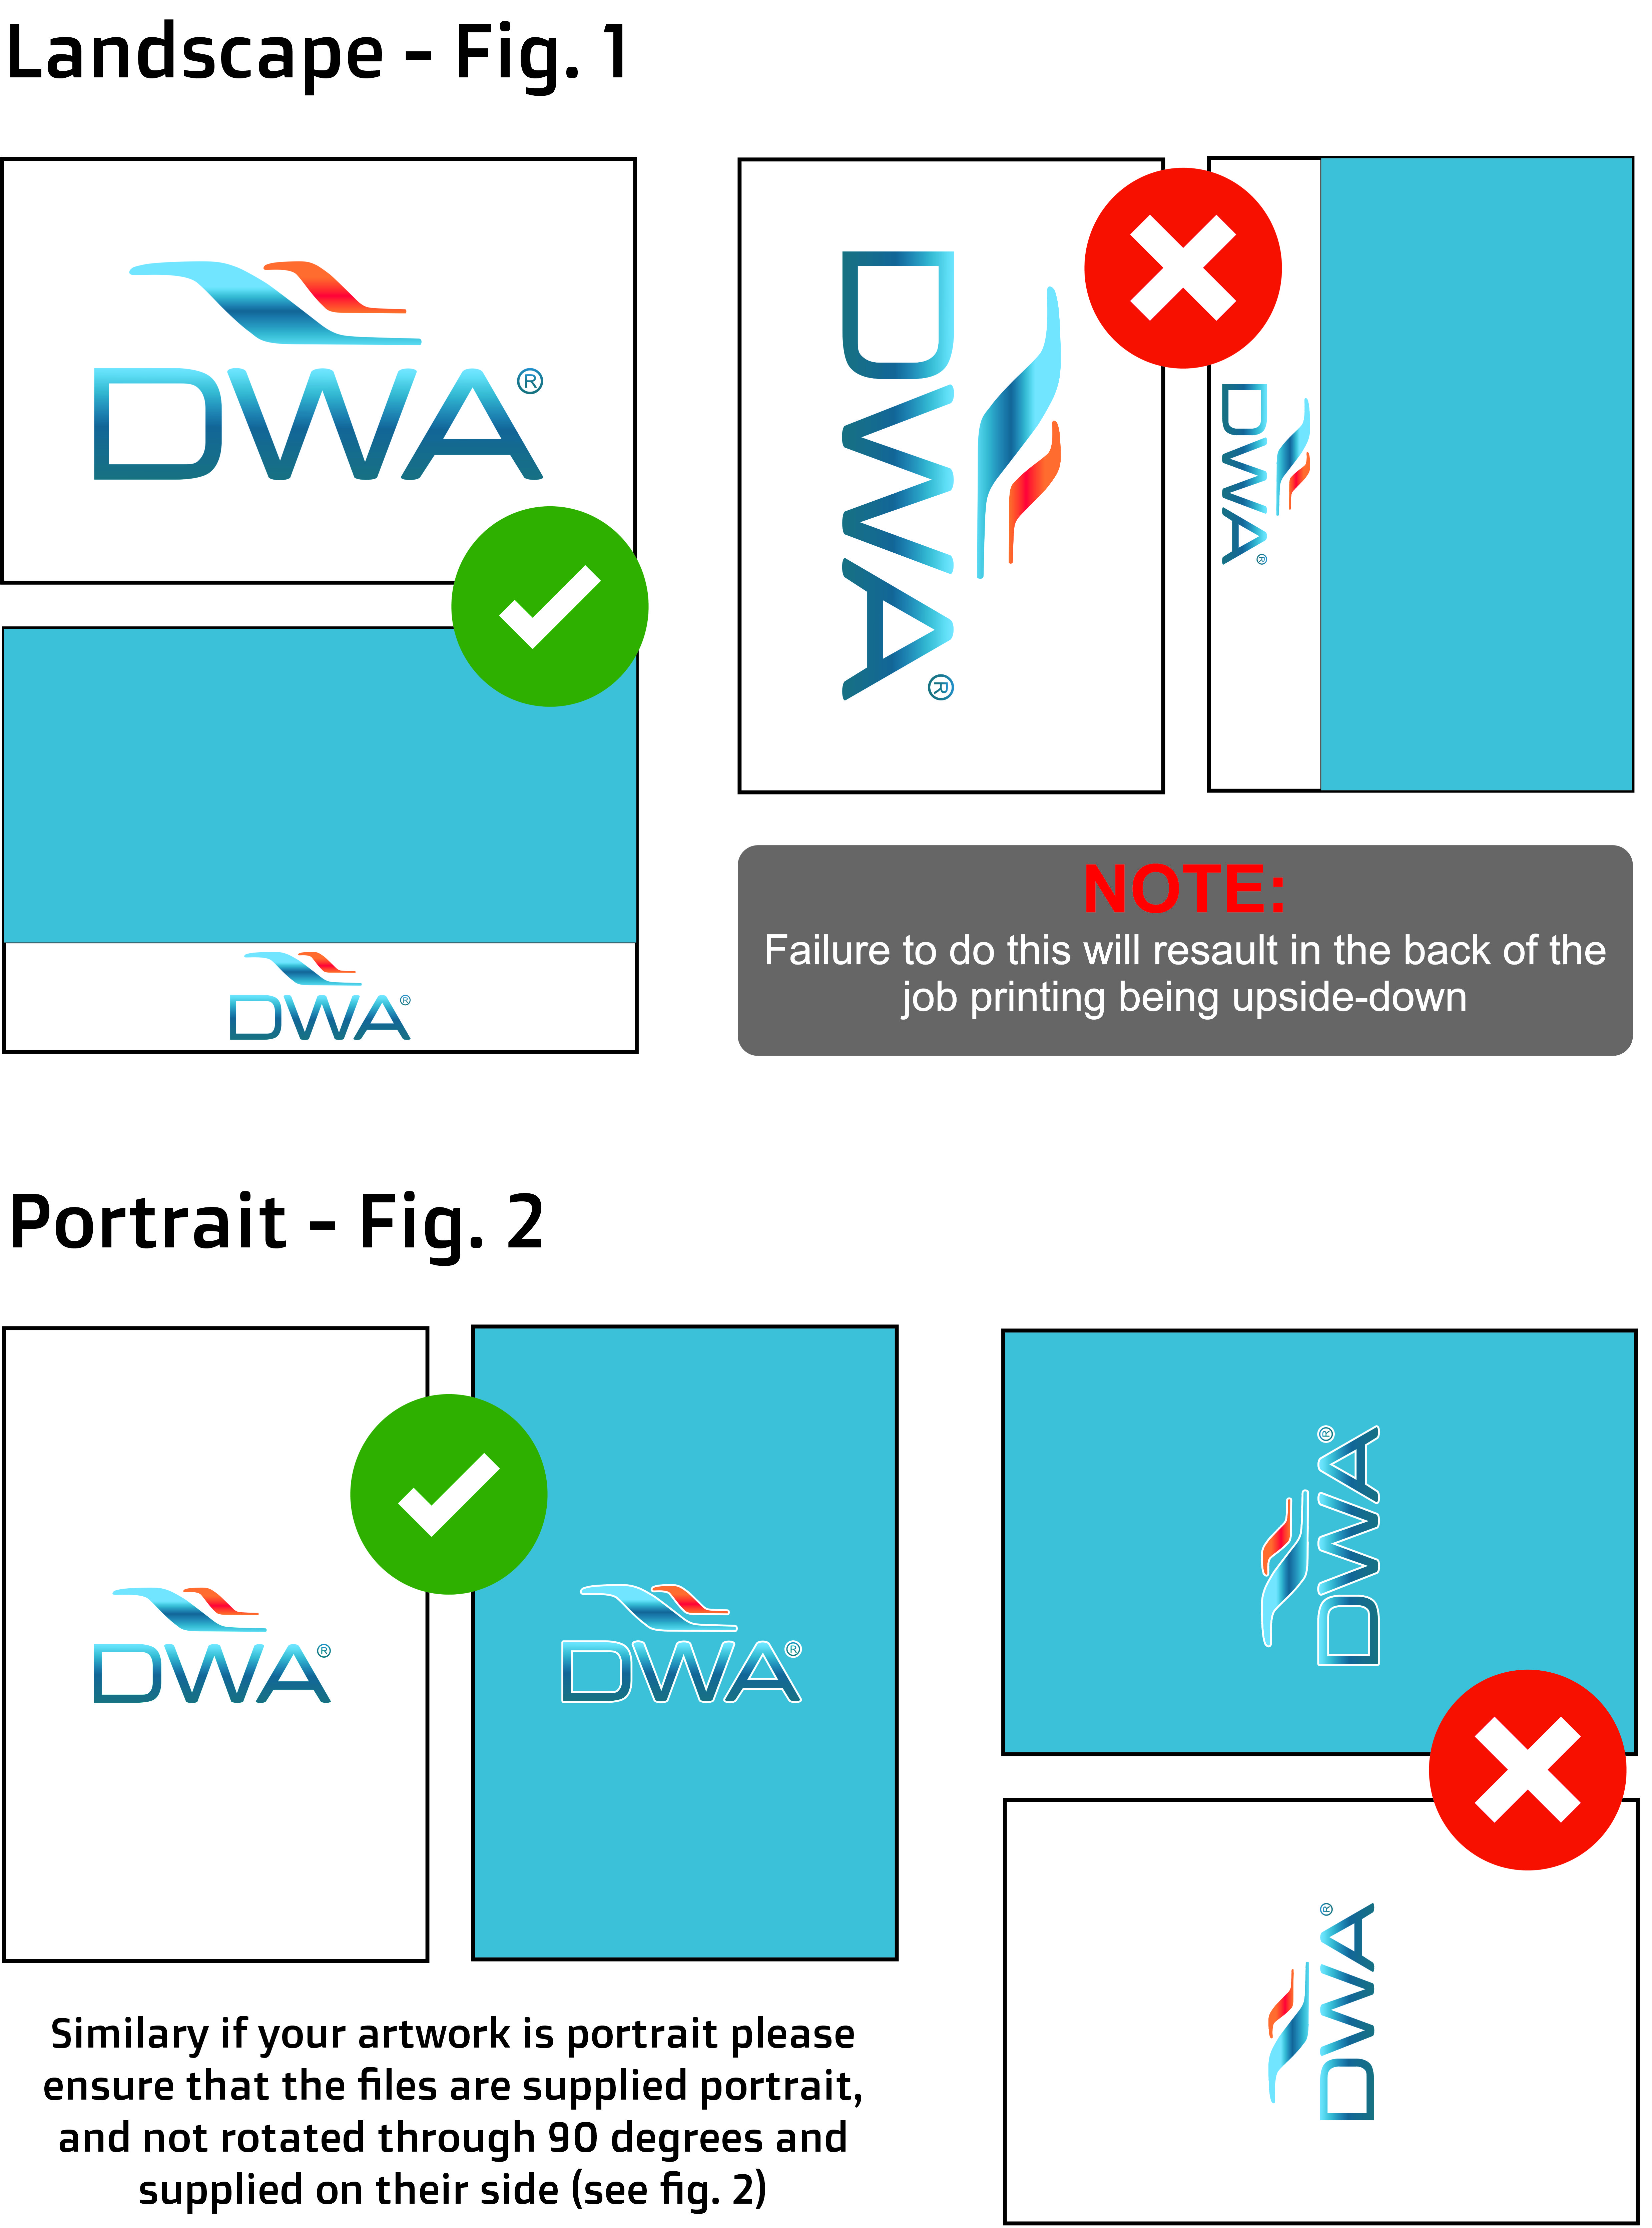
If your artwork is landscape, please supply your pages in landscape orientation. If your page is rotated 90 degrees, this will result in the back of your job printing upside down. Similarly, if your artwork is portrait, please supply your pages in portrait orientation.
.
Custom Shape Cutting File Preparation Guide
.
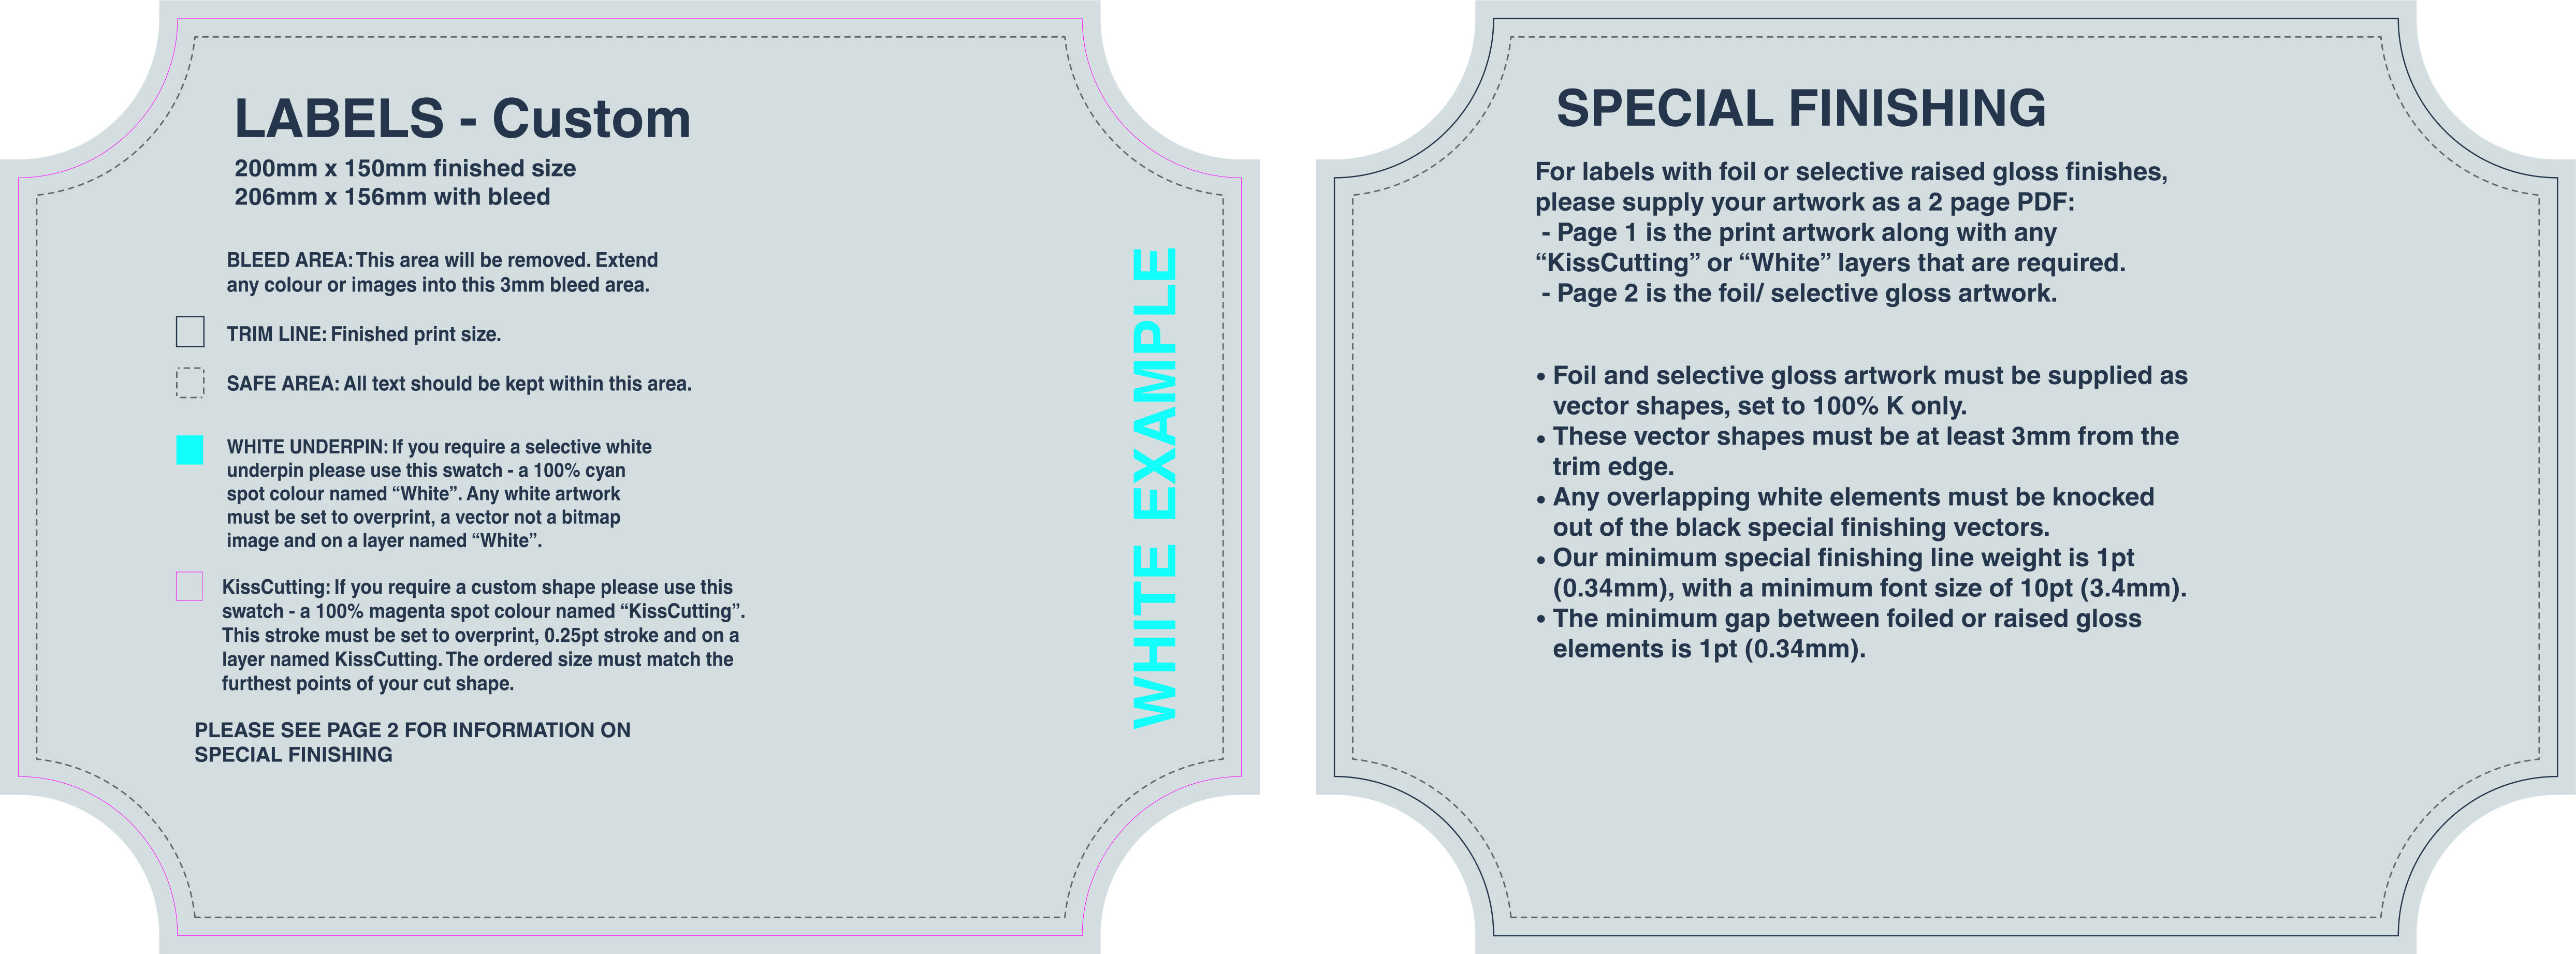
Cutting Line:
- Create your custom shape with a vector graphics program.
- Ensure the cutting line is 100% magenta.
- Place the cutting line on page 2 of the PDF file.
Bleed and Safe Zone:
- Extend your design 3mm beyond the shape's edges if a bleed is required.
- intain a 20mm safe zone within your shape for essential content.
File Format
- your design as an AI, PDF, or EPS file.
By adhering to these guidelines, you'll ensure accurate custom shape cutting. Thank you for choosing us for your project!
Pro Tip: Don't add a border to your sticker as there's a 2mm tolerance which means they *might* look wonky if you add a perfect border.
.
.
Have More Questions?
If you have additional questions or need further assistance, contact us and we'll make every effort to provide you with the answers you need.
Feel free to use this revised conclusion section as part of your guidelines for setting up design files for print on your website. It encourages customer engagement and ensures that they can easily access support when necessary.